

Watermelon Popsicles: A Refreshing Treat for Any Day
Ah, summer! It’s time for sun-kissed afternoons and lazy days spent outdoors. One of my fondest memories is of my grandmother slicing juicy watermelons on hot days, the sweet aroma wafting through the air. It always felt like magic—something about that vibrant red hue and the cool, refreshing taste of a watermelon slice made everything feel just right. Fast forward to today, and while I still love that classic snack, I’ve discovered a delightful twist: homemade Watermelon Popsicles!
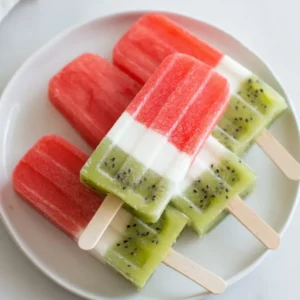
These popsicles are a creamy and zesty delight featuring fresh watermelon and tangy kiwi, perfect for cooling off on warm days. Plus, they’re simple to make and use just a handful of ingredients. So, whether you’re looking for easy summer desserts or cozy, kid-friendly snacks, these Watermelon Popsicles are the answer. This is one you’ll definitely want to pin for later!
Why You’ll Love This Recipe
- Quick and Easy: A summertime treat that doesn’t require any complicated techniques.
- No-Bake: Perfect for those hot days when you want something sweet without turning on the oven.
- Healthier Alternative: Made with natural ingredients, these pops are a refreshing way to indulge without the guilt.
- Family-Friendly: Kids love them! They’re fun to make together and even more fun to enjoy.
- Customization Galore: Endless options to personalize your popsicles to suit your taste.
Ingredients You’ll Need for Watermelon Popsicles
- 3 Cups Watermelon (Cubed)
- 3/4 Cup Coconut Yogurt
- 5 Kiwis (Use 4-5 Kiwis, cubed)
Let’s Make It Together
-
Begin by cubing the watermelon into small pieces. Toss those juicy cubes into a blender or food processor and blend until smooth. The color should be a gorgeous, bright pink—pure summer!
-
Transfer the watermelon puree into your popsicle molds. Make sure it’s evenly distributed and pop them into the freezer for about 3 hours until they’re firm.
-
After 3 hours, add a thin layer of creamy coconut yogurt over the frozen watermelon base. This layer will add a delightful creaminess that contrasts beautifully with the fruity flavors. Place the mold back in the freezer for another 1.5 hours.
-
While you wait, peel and cube the kiwis. Place them in the blender or food processor and blend until smooth. You may love the vibrant green color that will shine through each popsicle!
-
Once the yogurt layer is set, pour the kiwi puree over the yogurt layer in the molds. Put them back in the freezer for a good 6 hours—or until completely frozen. Trust me, the anticipation will be worth it!
Fun Ways to Customize It
- Berry Bliss: Swap out your kiwi for strawberries or blueberries for a burst of different flavors and colors.
- Mint Infusion: Add fresh mint leaves to the watermelon puree for a refreshing twist.
- Coconut Delight: Mix in shredded coconut into the coconut yogurt for added texture and flavor!
- Tropical Paradise: Try mixing in some pineapple chunks with the watermelon for a tropical vibe!
Chef Emma’s Helpful Tips
- Make-Ahead: These popsicles are great for meal prep. Make them a couple of days ahead and have them ready for hot summer days.
- Mold Options: Feel free to use different shapes! Silicone molds work great for easy removal.
- Storage Suggestions: Once frozen, you can transfer them to a freezer-safe bag to save space in your freezer. They’ll last for about 2-3 months!
- Kiwi Slicing Trick: If you’re struggling to slice your kiwi smoothly, try refrigerating them before cutting to make the skin firmer.
What’s Inside – Nutrition Breakdown
- Serving Size: 1 popsicle
- Calories: Approximately 70
- Carbs: 14g
- Sugar: 8g
- Fat: 2g
- Protein: 1g
- Sodium: 5mg
Frequently Asked Questions
Can I make this ahead?
Absolutely! These popsicles can be made several days in advance and stored in the freezer.
Can I use different ingredients?
Yes! Feel free to swap out the kiwi for any berry or tropical fruit you prefer.
How do I store leftovers?
Store leftover popsicles in a freezer-safe container or bag for up to 2-3 months. Just separate each one with parchment paper to prevent sticking.
How long does it last?
These watermelon popsicles last up to 2-3 months in the freezer, but they are best enjoyed sooner rather than later for optimum freshness!
A Cozy Closing Note
Creating these Watermelon Popsicles is like capturing summer in a bite. Their vivid colors and fresh flavors evoke childhood memories and warm, sunny days. What’s not to love about a treat that’s as delicious as it is nourishing? Save this Watermelon Popsicles recipe to your summer treats board, so it’s ready when you need a cool, refreshing bite that feels like a hug on a stick!
Watermelon Popsicles
Ingredients
Main Ingredients
- 3 cups Watermelon (Cubed)
- 3/4 cup Coconut Yogurt
- 5 Kiwis (Cubed) Use 4-5 kiwis
Instructions
Preparation
- Begin by cubing the watermelon into small pieces. Toss those juicy cubes into a blender or food processor and blend until smooth.
- Transfer the watermelon puree into your popsicle molds, ensuring it's evenly distributed. Freeze for about 3 hours until firm.
- Add a thin layer of creamy coconut yogurt over the frozen watermelon base, then place the molds back in the freezer for another 1.5 hours.
- Peel and cube the kiwis, then blend until smooth.
- Once the yogurt layer is set, pour the kiwi puree over the yogurt layer in the molds. Freeze for another 6 hours or until completely frozen.

")