

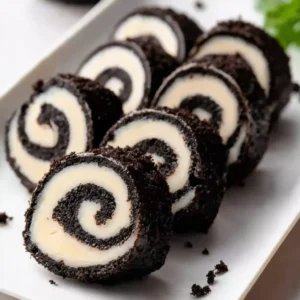
A Cozy Treat: Oreo Sushi Rolls
Imagine a rainy afternoon, the kind where the world outside is muted, and the only sound is the gentle patter of raindrops against the windowpane. It’s the perfect opportunity for a little sweet indulgence. One of my fondest memories as a child is when my mother would gather us in the kitchen, making delightful treats that would fill the air with warmth and comfort. Today, I’m excited to share a playful twist on dessert that captures that cozy sentiment: Oreo Sushi Rolls! A fun and easy no-bake dessert that’s sure to be a crowd-pleaser, these mouthwatering treats combine the rich flavor of Oreo cookies with a sweet filling of your choice—perfect for any celebration or simply a comforting snack at home.
These delightful bites are not only visually appealing but are also a fantastic option for an easy weeknight dessert that both kids and adults will adore. So grab your ingredients, and let’s whip up something unforgettable! This is one you’ll definitely want to pin for later!
Why You’ll Love This Recipe
- Quick and Simple: These no-bake Oreo Sushi Rolls come together in just a few steps, making them ideal for busy days.
- Crowd-Pleasing: Perfect for parties, potlucks, or holiday gatherings, everyone will love this unique dessert!
- Family-Friendly Fun: This recipe invites creativity, so get the kids involved in choosing fillings and toppings!
- Endlessly Customizable: With so many filling options, you can tailor each roll to your taste, whether you like creamy Nutella or zesty fruit.
- No Cooking Required: Ideal for warm weather or simply when you’re not in the mood to turn on the oven.
Ingredients You’ll Need for Oreo Sushi Rolls
Gather These Simple Ingredients:
- 1 package Oreo cookies (about 15-20 cookies)
- 1/4 cup cream cheese or a similar binding agent
- Your choice of sweet filling (e.g., Nutella, yogurt, diced fruit, or sprinkles)
- Optional toppings (e.g., additional sprinkles, chocolate drizzle, or crushed nuts)
Let’s Make It Together
Follow these cozy steps to create your delicious Oreo Sushi Rolls:
- Crush Oreo cookies into fine crumbs in a bowl, letting the rich chocolatey aroma envelop you.
- Mix the crumbs with a small amount of cream cheese or other binding agent until it resembles a dough. It should be moldable but not sticky!
- Roll out the dough into a rectangle on a surface lined with parchment paper. Use a rolling pin and take your time; it’s all about that cozy texture!
- Spread your choice of sweet filling evenly over the dough, allowing your senses to feast on the lusciousness.
- Carefully roll the dough into a log shape, pressing gently as you go to create tight seams.
- Chill the rolled log in the refrigerator for at least one hour, allowing the flavors to marry together beautifully.
- Once chilled, slice the log into bite-sized pieces resembling sushi. The moment you cut into it is pure magic—a slice of joy that will bring smiles all around!
Fun Ways to Customize It
Here are a few delicious variations to try with your Oreo Sushi Rolls:
- Fruity Delight: Use a sweet cream filling and add chopped strawberries or bananas for a burst of freshness. The combination of creamy and fruity is heavenly!
- Nutty Crunch: Mix in some crunchy peanut butter with your chocolate filling, and sprinkle chopped nuts on top for added texture.
- Holiday Sprinkles: Around the festive season, use vibrant holiday-themed sprinkles mixed into the filling—a delightful treat that captures the spirit of the season.
- Chocolate Drizzle: After slicing, drizzle melted chocolate over the rolls for a touch of indulgence that’s irresistible!
Chef Emma’s Helpful Tips
Here are some practical tips to ensure perfect results every time:
- Make-ahead Advice: Prepare the logs a day in advance and keep them wrapped in parchment paper for an easy dessert option whenever you need it.
- Ingredient Swaps: If you’re looking for lower calories, consider using Greek yogurt as a sweet filling; it’s delicious and adds protein!
- Slicing Tricks: Use a warm knife to slice through the rolls smoothly. This helps to create clean, neat edges for that perfect presentation.
- Storage Suggestions: Store any leftovers in an airtight container in the refrigerator for up to three days. They’re still delightful even after a couple of days!
What’s Inside – Nutrition Breakdown
- Serving Size: 1 slice (of the roll)
- Calories: 120
- Carbs: 18g
- Sugar: 9g
- Fat: 6g
- Protein: 1g
- Sodium: 65mg
Frequently Asked Questions
Can I make this ahead?
Absolutely! You can prepare the Oreo Sushi Rolls a day before serving. Just remember to refrigerate them until you’re ready to slice and serve.
Can I use different ingredients?
Of course! Get creative with fillings—anything from fruit to different types of spreads works beautifully.
How do I store leftovers?
Keep any leftover sushi rolls in an airtight container in the refrigerator for up to three days.
How long does it last?
Ideally, enjoy these delicious rolls within three days for the best taste and texture.
A Cozy Closing Note
Oreo Sushi Rolls are not just a treat; they’re a delightful experience filled with sweet memories and endless possibilities for creativity. Each bite is a reminder of life’s little joys and encourages us to get a bit playful in the kitchen. So why not add this delightful recipe to your dessert repertoire? Save this Oreo Sushi Rolls to your recipe board so it’s ready when you need a cozy treat! Happy baking!
Oreo Sushi Rolls
Ingredients
Main Ingredients
- 1 package Oreo cookies (about 15-20 cookies)
- 1/4 cup cream cheese or a similar binding agent
- varies Your choice of sweet filling (e.g., Nutella, yogurt, diced fruit, or sprinkles) Tailor the filling to your taste.
- optional Optional toppings (e.g., additional sprinkles, chocolate drizzle, or crushed nuts) Customize as desired.
Instructions
Preparation
- Crush Oreo cookies into fine crumbs in a bowl, letting the rich chocolatey aroma envelop you.
- Mix the crumbs with a small amount of cream cheese or other binding agent until it resembles a dough. It should be moldable but not sticky!
- Roll out the dough into a rectangle on a surface lined with parchment paper.
- Spread your choice of sweet filling evenly over the dough.
- Carefully roll the dough into a log shape, pressing gently as you go to create tight seams.
- Chill the rolled log in the refrigerator for at least one hour.
- Once chilled, slice the log into bite-sized pieces resembling sushi.


")